


Blog, Networking Device
Trunk Port vs Access Port: Understanding the Key Differences

Oct
As networks evolve, VLAN technology logically divides a physical VLAN into multiple ones so that hosts in the same VLAN can interconnect while hosts in different VLANs cannot. This greatly enhances the security and maintainability of LANs. In this article, we will introduce the Access port vs Trunk port in VLAN in detail and compare them so that you can better understand how they are configured in different application scenarios.
Table of contents
What is an Access Port?
An access port is a port on a switch that connects to an end device. Access ports only accept and send traffic for specific VLANs
Access port sends frames
When a frame is sent, it is stripped of its Tag, and the frame forwarded is untagged. Access interfaces are usually connected to end devices, which can only recognize untagged frames.
Access port receives frames
- If the frame is untagged, it receives it and marks it with the port’s PVID (i.e., the default VLAN of the Access interface).
- If the frame is tagged, it will be received when its VLAN-ID is the same as the interface PVID. Otherwise, discard it.
What is a Trunk Port?
A trunk port is a port on a switch that is connected to the switch or router. It can handle traffic from multiple VLANs and holds a specific list of allowed VLANs.
Trunk port sends frames
- If the frame’s VLAN ID is the same as the interface PVID and the VLAN is in the list of allowed VLANs, the Tag is removed, and the data frame is sent.
- If the frame’s VLAN ID differs from the interface’s PVID and the VLAN is in the list of permitted VLANs, keep the original Tag and send the Tagged frame. If the data frame’s VLAN ID is not in the list of permitted VLANs, the frame is prohibited from being sent out of the interface.
Trunk port receives Frames
- if the received data frame is an Untagged frame, tag the data frame with the PVID of the interface. Then, receive the frame if the PVID is in the Allow-pass VLAN list of the interface or discard the frame if the PVID is not in the Allow-pass VLAN list.
- If the received data frame is a Tagged frame and its VLAN-ID is in the interface’s Allow-pass VLAN list, receive the frame. Otherwise, it is discarded.
Topology Example Analysis
Looking at the topology, can you guess which access and trunk ports are based on the above two port definitions?
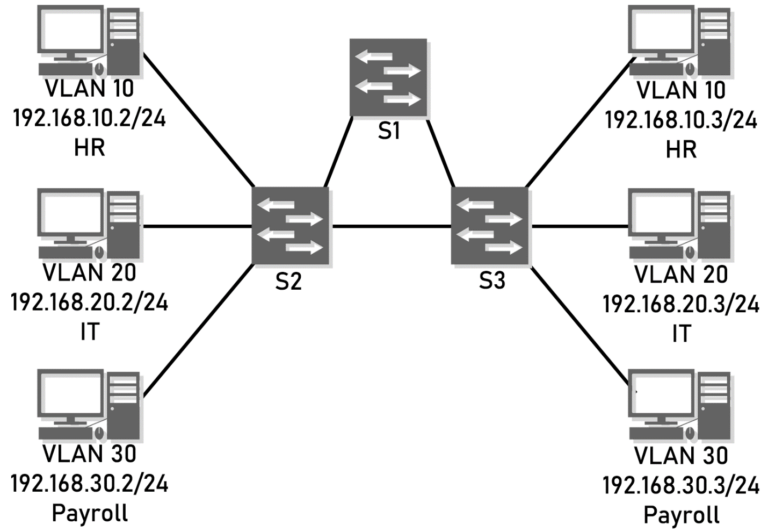
It’s time to reveal the answer. The ports will be configured as follows:

The yellow circle marked with an ‘A’ is the access port, and the blue circle marked with a ‘T’ is the trunk port. The ports directly connected to the computer are access ports, which can only carry specific VLAN traffic.
Ports on interconnected switches are configured as trunk ports because they need to carry traffic for all three VLANs. These trunk ports have a list of permitted VLANs that you want to be able to pass through the link, including VLAN10, VLAN20, and VLAN30 in this picture.
Access Port vs Trunk Port: What’s the Difference?
| Parameters | Trunk Port | Access Port |
| VLAN assignment | It supports multiple VLANs. | It supports a single VLAN. |
| Tags | Multiple VLANs are allowed to traverse and add tags. | Single VLAN is allowed to traverse and remove tags. |
| Purpose | It connects switches or routers. | It connects end devices to the network. |
| Protocols | 802.1Q | 802.1Q,ISL |
| VLAN tagging | It supports VLAN tagging. | It does not support VLAN tagging. |
| Bandwidth | It provides a higher bandwidth | Comparatively lower than the trunk port. |
| Broadcast domain | It allows segmentation into separate broadcast domains. | Traffic is part of the same broadcast domain. |
| Voice VLAN | Voice VLAN is a feature that is not supported in Trunk Port. | Voice VLAN is the feature that is supported in Access Port. |
| Frames | It supports tagged frames | It supports untagged frames. |
| Broadcast domain | Supports multiple broadcast domains. | Supports only a single broadcast domain. |
| Troubleshooting | Troubleshooting is difficult | Troubleshooting is simple because only a single VLAN is affected |
| Ideal application | It is ideal for larger networks with multiple VLANs that are used to connect between the switches. | It connects end-user devices like laptops, printers, and computers to the network. |
| merit | It is highly flexible and can realize communication between different VLANs. Efficiently handle traffic and bandwidth | Easy to use, suitable for isolated networks |
| shortcoming | Packets need to be labeled, which increases the complexity of processing. | It is less flexible and cannot communicate between different VLANs |
Access Port vs. Trunk Port: Which One Should You Use?
If the connected device only needs to access one VLAN or subnet, use the access port to configure the switch. If network devices, such as printers, IP phones, etc., are shared across multiple subnets or VLANs, you must connect to a trunk port to meet the requirements.
When a large enterprise needs to ensure data security and segregate different departments, it can connect computers in different departments to different Access ports and assign them to different VLANs to achieve network segregation and security management.
Network environments like data centers and enterprise networks require large bandwidth and multiple VLANs. Connecting switches and trunk ports can achieve high-speed data transfer and communication between VLANs.
Configuring Trunk Port and Access Port
Setting up these ports correctly is critical for optimal network performance. It ensures that data is routed correctly and VLAN traffic is handled correctly!
Configure the trunk port
- Use the command “configure terminal” to enter configuration mode
- Use the command “interface {{type slot/port} | {port-channel number}}” to specify the port to be configured and enter port configuration mode.
- Use the “switchport mode trunk” command to set the port as an access port.
- Use the command “switchport trunk allowed {vlan-list}{vlan-list}]}” specifies which VLANs are allowed to use the trunk port. This setting ensures that the trunk port can handle traffic from multiple VLANs. All VLANs on the trunk port are allowed by default.
This example shows how to add VLANs to the list of allowed VLANs on an Ethernet trunk port.
switch# configure terminal
switch(config)# interface ethernet 1/3
switch(config-if)# switchport mode trunk
switch(config-if)# switchport trunk allow vlan 15-20
Configure the access port
- Use the command “configure terminal” to enter configuration mode.
- Use the command “interface {{type slot/port} | {port-channel number}}” to specify the port to be configured and enter port configuration mode.
- Use the command “switchport mode access” to set the port as an access port.
- Use the command “switchport access vlan vlan-id” to assign it to the desired VLAN. This configuration simplifies network management and enhances security by specifying which VLAN traffic the access port carries. However, it cannot be assigned to a VLAN that does not exist and, if not specified, carries traffic for the default VLAN.
This example shows how to set an interface as an Ethernet access port that carries traffic for a specific VLAN.
switch# configure terminal
switch(config)# interface ethernet 1/10
switch(config-if)# switchport mode access
switch(config-if)# switchport access vlan 5
Verifying interface configuration
Regularly verifying the interface configuration is critical to ensuring optimal network performance. Administrators can check an interface’s operational status and configuration details using the show interface, switch port, and show interface brief commands.
Conclusion
This article describes the difference between access and trunk ports and provides examples to help you understand how to configure these two ports. Understanding the differences between access and trunk ports is critical to optimizing your network architecture. When planning or upgrading your network, consider how these ports best meet your needs to enhance your LAN’s reliability, security, and stability.
Read more
- How to Check & Solve Ethernet Cable Problems
- How to Extend WiFi Range? 13 Tips to Boost Your WiFi Signal
- How to Choose The Best Ethernet Cable For Gaming
- Passive vs Active DAC cable: How to Choose?
Reference