


Networking Device
What is Visual Fault Locator: A Beginner Guide

Jul
Updated on Mar 22, 2023
Are you looking for a beginner guide for visual fault locater? Do you know what a visual fault locater is? How does it work? How to use Visual Fault Locator? If not, here is the beginner guide for you.
Table of Contents
- What is a Visual Fault Locator?
- How Does Visual Fault Locator Work?
- How to Choose Visual Fault Locator?
- How to use Visual Fault Locator?
- Tips for Using Visual Fault Locators
- Final Words
What is a Visual Fault Locator?
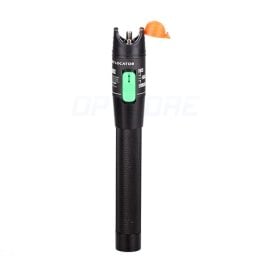
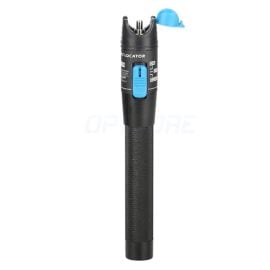
Visual Fault Locator (VFL), a visual fault identifier (VFI), VFL tester, fiber fault locator, or fiber fault detector, is a fiber cable testing tool to locate breaks or cracks in the optical fiber. By injecting a laser light into the fiber cable, VFL can help you identify the breakage or damage of optical fibers.
Visual Fault Locator is a low-cost test tool for field technicians to find and identify fiber optic cable breaks quickly.
How Does Visual Fault Locator Work?
The light that transfers signals through fiber optics is typically at a wavelength of 1300 to 1650nm, which is invisible to the naked eye. Visual Fault Locators emit a beam of laser light with a wavelength around 650nm, which is visible to the human eye. The Visual Fault Locator detects breaks, bends, and other damage in fiber optic cabling.
When the Visual Fault Locator is placed against the side of an intact fiber, very little light will be emitted from the end of the Visual Fault Locator. However, when the Visual Fault Locator is placed against a damaged fiber, more light will be emitted from the end of the Visual Fault Locator. The amount of light emitted will increase as the Visual Fault Locator is moved away from the damage.
This is because the Visual Fault Locator injects light into the fiber at a point where there is no damage. The Visual Fault Locator also collects the light scattered from the injury. The Visual Fault Locator amplifies this light and emits it from the end of the Visual Fault Locator.
The field engineer can locate the general area of fiber cable damage through this tool and then use other tools to repair or replace the cable.
How to Choose Visual Fault Locator?
Since there are many different Visual Fault Locators on the market, choosing the right one is essential. Here are some things to think about while choosing Visual Fault Locator:
#1 – Consider Your Fiber Cable Length
You first need to know the approximate distance of the fiber cable you will be testing. Because a lower power Visual Fault Locator support only limits fault locate distance. If you need to test a long fiber cable, ensure the Visual Fault Locator you choose supports a longer length.
#2 – Choose the Right Output Optical Power
The amount of output optical power determines the farthest distance you can use the Visual Fault Locator. A Visual Fault Locator with a higher output optical power will be more expensive than one with a lower output optical power. Still, it will allow you to test longer fiber cables. Take Optcore Pen Visual Fault Locator as an example; there are four main different output power, 1mw for 5km, 10mw for 10km, 20mw for 20km, and 30mw for 30km. Remember to choose the Visual Fault Locator according to your actual needs.
#3 – Choose the Right Wavelength
Most Visual Fault Locators on the market use a 650nm laser, but some use a 520nm laser. The 650nm Visual Fault Locator is the most common because it can be seen by the naked eye and is effective for most fiber optic testing applications. The 520nm Visual Fault Locator is used for more specialized applications where a higher wavelength is needed.
#4 – Consider Power Supply Type
Some Visual Fault Locators use AAA or AA batteries, while others come with a built-in rechargeable lithium battery. Visual Fault Locators that use batteries are more portable since they do not need to be plugged into an outlet. Visual Fault Locators with a built-in rechargeable battery are more expensive but can be used for a more extended period before needing to be recharged.
#5 – Consider Modulation Frequency
The blinking light is far more sensitive to the human eyes than a steady light. As a result, visual fault locators are available in two modes of operation: continuous wave and pulse light. The pulse light will help you quickly identify the breakage of an optical fiber.
#6 – Consider Fiber Connector Type
Some Visual Fault Locators come with a 2.5mm fiber connector, while others come with a 1.25mm fiber connector. The 2.5mm connector is more common because it can be used with most fiber optic cables with 2.5mm ferrule such as E2000, SC, ST, and FC. The 1.25mm connector uses fiber optic cables with a 1.25mm ferrule such as LC and MU.
#7 – Consider The VFL Shapes
The Visual Fault Locator comes in a variety of shapes. The most common shapes are pen-style and Hand-held style VFL. The pen-style Visual Fault Locator is smaller and more portable, while the Hand-held style Visual Fault Locator is larger and has a more extended range.
They have identical functions, but the pen-style Visual Fault Locator is more popular and often used.
-
Product on sale
 20mW (20km) Pen Shape Fiber Optic Visual Fault Locator (VFL) with 2.5mm Universal AdapterOriginal price was: US$ 17.00.US$ 14.90Current price is: US$ 14.90. (Excl. VAT)
 -
Product on sale
 10mW (10km) Pen Shape Fiber Optic Visual Fault Locator (VFL) with 2.5mm Universal AdapterOriginal price was: US$ 14.00.US$ 10.90Current price is: US$ 10.90. (Excl. VAT)
 -
Product on sale
 1mW (5km) Pen Shape Fiber Optic Visual Fault Locator (VFL) with 2.5mm Universal AdapterOriginal price was: US$ 12.00.US$ 9.90Current price is: US$ 9.90. (Excl. VAT)
How to use Visual Fault Locator?
Now let us see how to use the Visual Fault Locator. Here are the steps:
1. Connect the Visual Fault Locator to the fiber optic cable you want to test.
2. Turn on the Visual Fault Locator and check if the cable is broken.

Tips for Using Visual Fault Locators
Now that you know how to choose the right Visual Fault Locator, here are some tips for using it:
- NEVER look directly into the Visual Fault Locator’s beam when turned on.
- NEVER look into the end of a fiber that may have a visual fault finder or another laser attached to it. Direct laser beam contact can cause significant eye damage and should be avoided at all costs. Seek medical assistance right once if direct eye exposure is suspected.
- Use the Visual Fault Locator in a well-lit area for best results.
- If you are testing a long fiber cable, use a Visual Fault Locator with a higher output optical power.
- If you are testing a fiber cable with a 1.25mm ferrule, use a Visual Fault Locator with a 1.25mm connector.
- Use the Visual Fault Locator in pulse mode for best results.
- Remove the batteries from the Visual Fault Locator when not in use.
- Store the Visual Fault Locator in a dry and clean place.
- Do not drop or hit the Visual Fault Locator.
- Do not use the Visual Fault Locator if it is damaged.
- After 50 matings, or sooner if performance begins to deteriorate, clean the fiber connector end face.
- If the VFL tester performance remains poor after three cleanings, replace the split sleeves.
- After usage, always replace the VFL dust cap and turn the device off.
Final Words
Visual Fault Locators are a vital tool for anyone working with fiber optic cables. They are simple to use and can save you time and money. With this guide, I believe you know how to choose the right Visual Fault Locator and how to use it.
Now I would like to hear from you:
- Do you have any questions about Visual Fault Locators?
- Which one is the VFL tester do you prefer?
- What tips would you add for using Visual Fault Locators?
- Or maybe you have some tips of your own to share.
Either way, let me know by leaving a comment below right now.
Read more:
- Top 10 Test Tools For Fiber Optic Transceiver Technicians
- Do you know the fiber test method based on OTDR technology?
- Understanding the Optical Transceiver Quality Testing